Quick start for Mocha + Chai + SuperTest in API Testing with Mock Server (moco) and Tips

There are many combinations to test APIs, but here we choose a commonly used combination for demonstration, the rests will be pretty much the same or likely. And we will use moco to quickly simulate a server.

Environment Settings:

  1. Install Homebrew

    /usr/bin/ruby -e "$(curl -fsSL https://raw.githubusercontent.com/Homebrew/install/master/install)"

  2. Install NodeJS

    brew install node

  3. Install Mocha, Chai, SuperTest, Exoress and Body-Parser

    1
    2
    3
    4
    5
    npm install -g mocha
    npm install chai
    npm install supertest
    npm install express
    npm install body-parser
  4. Download the moco standalone file from Github

  5. Since Mocha will only run scripts under “test” folder, so we have to create a folder named “test”.

Start a simple server and test on it:

  1. Create a json file named “user1.json”, and add following content to it:

    1
    2
    3
    4
    5
    6
    7
    8
    [
    {
    "response" :
    {
    "status" : "200"
    }
    }
    ]

    Please note: we only define the HTTP status code here for now.

  2. Start the Mock server using the command when under the “test” folder:

    java -jar moco-runner-0.11.1-standalone.jar http -p 3000 -c user1.json

    And you should see following lines in your Terminal:

    1
    2
    3
    10 Jul 2017 16:17:43 [main] INFO Server is started at 3000
    10 Jul 2017 16:17:43 [main] INFO Shutdown port is 56123
    10 Jul 2017 16:17:45 [nioEventLoopGroup-3-2] INFO Request received:
  3. You can open the URL http://localhost:3000/ in browser to check the response of the API, but currently since we havn’t set and response value except the status code, so you won’t see anything in the browser.

  4. Create a script file named “user1_test.js”, and add following to it:

    1) Add the alias to shorten the names for requiring libs:

    1
    2
    3
    var should = require('chai').should(),
    expect = require('chai').expect,
    supertest = require('supertest'),

    2) Setup the URL we want to test against:

    api = supertest('http://localhost:3000');

    3) Define a function to describe the feature we want to test:

    1
    2
    3
    describe('User', function() {
    });

    4) Define a detailed test step to execute the test script, by adding it in the content of function above:

    1
    2
    3
    it('should return a response with HTTP code 200', function(done) {
    api.get('').expect(200, done);
    });
  5. Run the test to check the result by using:

    mocha or mocha user1_test.js

    And you should see the result like:

    1
    2
    3
    4
    User
    ✓ should return a response with HTTP code 200
    1 passing (28ms)

    Great! It works.

  6. Now, let’s make sure it works as expected by change the expected HTTP code to 404, and run it again. You should see the following:

    1
    2
    3
    4
    5
    6
    7
    8
    User
    1) should return a response with HTTP code 200
    0 passing (32ms)
    1 failing
    1) User should return a response with HTTP code 200:
    Error: expected 404 "Not Found", got 200 "OK"

    Awesome! It means the test really works. Now, revert the change.

  7. It’s time to add more parameters to make it a little complex.

    1) Add the formatter of HTTP request header in test script, and change the line of API test to following:

    api.get('').set('Accept', 'application/json').expect(200, done);

    2) Change the response of server to point to a specific URL, by adding the URI above the HTTP status code in “user1.json”, and the entire file should looks like:

    1
    2
    3
    4
    5
    6
    7
    8
    9
    10
    11
    12
    [
    {
    "request" :
    {
    "uri" : "/users/1"
    },
    "response" :
    {
    "status" : "200"
    }
    }
    ]

    Please note: don’t bother to restart the Mock Server. Once you save the json file with correct format moco provided, it will restart itself automatically. But if you save with any error, you have to fix it before start it, otherwise it won’t response correctly. For detailed moco usage and API docuemnts, please refer to the Documents section on moco Github page.

    3) Now, it’s time to change the test script accordingly. We need to change the line of API test to following:

    api.get('/users/1').set('Accept', 'application/json').expect(200, done);

    4) Let’s run the test script again, you should see the test pass:

    1
    2
    3
    4
    User
    ✓ should return a response with HTTP code 200 (177ms)
    1 passing (186ms)

    5) We can also add some text response into API response, like following:

    1
    2
    3
    4
    5
    6
    7
    8
    9
    10
    11
    12
    13
    14
    15
    16
    [
    {
    "request" :
    {
    "uri" : "/users/1"
    },
    "response" :
    {
    "status" : "200",
    "json":
    {
    "text": "Not Empty"
    }
    }
    }
    ]

    6) Then change the test script correspondingly:

    1
    2
    3
    4
    5
    6
    7
    it('should return a response with HTTP code 200 and the response text should be "Not Empty"', function(done) {
    api.get('/users/1').set('Accept', 'application/json').expect(200).end(function(err,res){
    expect(res.body).to.have.property("text");
    expect(res.body.text).to.equal("Not Empty");
    done(err);
    });
    });

    The test result should show “Pass”.

    7) What if we change the expected HTTP status code ot the expected response text? Let’s try.

    After change the expected HTTP status code to 500, once the test run, the result will be:

    1
    2
    3
    4
    5
    6
    7
    8
    User
    1) should return a response with HTTP code 200 and the response text should be "Not Empty"
    0 passing (44ms)
    1 failing
    1) User should return a response with HTTP code 200 and the response text should be "Not Empty":
    Error: expected 500 "Internal Server Error", got 200 "OK"

    Revert the change and change the expected response text to “Empty”, once the test run, the result will be:

    1
    2
    3
    4
    5
    6
    7
    8
    9
    10
    11
    12
    13
    User
    1) should return a response with HTTP code 200 and the response text should be "Not Empty"
    0 passing (46ms)
    1 failing
    1) User should return a response with HTTP code 200 and the response text should be "Not Empty":
    Uncaught AssertionError: expected 'Not Empty' to equal 'Empty'
    + expected - actual
    -Not Empty
    +Empty

    Don’t forget to revert the change.

    8) The test script works as expected, so next, we will make it more complex.

Make the server more complex and of course, test against it:

  1. Append the API response to only respond to specific request, change the API response to:

    1
    2
    3
    4
    5
    6
    7
    8
    9
    10
    11
    12
    13
    14
    15
    16
    17
    18
    19
    [
    {
    "request" :
    {
    "uri" : "/users/1",
    "json": {
    "name": "Yale"
    }
    },
    "response" :
    {
    "status" : "200",
    "json":
    {
    "gender": "Male"
    }
    }
    }
    ]
  2. Change the test script to reflect the changes:

    1
    2
    3
    4
    5
    6
    7
    it('should return a response with HTTP code 200, and the response text should be "Male" if request the gender of "Yale" as "name"', function(done) {
    api.get('/users/1').set('Accept', 'application/json').send({name:"Yale"}).expect(200).end(function(err,res){
    expect(res.body).to.have.property("gender");
    expect(res.body.gender).to.equal("Male");
    done(err);
    });
    });
  3. Once run the test script, it will Pass.

  4. If we change the value in the request, like change “Yale” to “Yong”, once test script runs, it will show:

    1
    2
    3
    4
    5
    6
    7
    8
    User
    1) should return a response with HTTP code 200, and the response text should be "Male" if request the gender of "Yale" as "name"
    0 passing (47ms)
    1 failing
    1) User should return a response with HTTP code 200, and the response text should be "Male" if request the gender of "Yale" as "name":
    Uncaught AssertionError: expected {} to have property 'gender'
  5. If we change the value in the request, like change the 2 “gender” to “sex”, once test script runs, it will show:

    1
    2
    3
    4
    5
    6
    7
    8
    User
    1) should return a response with HTTP code 200, and the response text should be "Male" if request the gender of "Yale" as "name"
    0 passing (39ms)
    1 failing
    1) User should return a response with HTTP code 200, and the response text should be "Male" if request the gender of "Yale" as "name":
    Uncaught AssertionError: expected {} to have property 'sex'
  6. If we change the value in the request, like change “Male” to “Man”, once test script runs, it will show:

    1
    2
    3
    4
    5
    6
    7
    8
    User
    1) should return a response with HTTP code 200, and the response text should be "Male" if request the gender of "Yale" as "name"
    0 passing (44ms)
    1 failing
    1) User should return a response with HTTP code 200, and the response text should be "Male" if request the gender of "Yale" as "name":
    Uncaught AssertionError: expected {} to have property 'gender'
  7. You may notice that in the test script, we still use GET method rather than PUT or POST, but we still can let the test Pass. Now, let’s strict it. In the API response, we need to change it to following:

    1
    2
    3
    4
    5
    6
    7
    8
    9
    10
    11
    12
    13
    14
    15
    16
    17
    18
    19
    20
    21
    22
    23
    24
    25
    26
    27
    28
    29
    30
    31
    32
    33
    34
    35
    36
    37
    38
    [
    {
    "request" :
    {
    "uri" : "/users/1",
    "method": "get",
    "json": {
    "name": "Yale"
    }
    },
    "response" :
    {
    "status" : "500",
    "json":
    {
    "gender": "Male"
    }
    }
    },
    {
    "request" :
    {
    "uri" : "/users/1",
    "method": "put",
    "json": {
    "name": "Yale"
    }
    },
    "response" :
    {
    "status" : "200",
    "json":
    {
    "gender": "Male"
    }
    }
    }
    ]
  8. Simply change the HTTP method to “put” in test script and check the result:

    In the test script:

    1
    2
    3
    4
    5
    6
    api.put('/users/1').set('Accept', 'application/json').send({name:"Yale"}).expect(200).end(function(err,res){
    expect(res.body).to.have.property("gender");
    expect(res.body.gender).to.equal("Male");
    done(err);
    });
    });

    And the test result:

    1
    2
    3
    4
    User
    ✓ should return a response with HTTP code 200, and the response text should be "Male" if request the gender of "Yale" as "name"
    1 passing (41ms)
  9. Let’s see what if we change the HTTP method to “get” again in test script and check the result:

    In the test script:

    1
    2
    3
    4
    5
    6
    api.get('/users/1').set('Accept', 'application/json').send({name:"Yale"}).expect(200).end(function(err,res){
    expect(res.body).to.have.property("gender");
    expect(res.body.gender).to.equal("Male");
    done(err);
    });
    });

    And the test result:

    1
    2
    3
    4
    5
    6
    7
    8
    User
    1) should return a response with HTTP code 200, and the response text should be "Male" if request the gender of "Yale" as "name"
    0 passing (39ms)
    1 failing
    1) User should return a response with HTTP code 200, and the response text should be "Male" if request the gender of "Yale" as "name":
    Error: expected 200 "OK", got 500 "Internal Server Error"

Final stage - more advanced usage:

  1. If we want to add more API responses, do we need to add them into one json file? Certainly not, let’s see how we can do that.

    1) Create another json file named “user2”, and add following content to it:

    1
    2
    3
    4
    5
    6
    7
    8
    9
    10
    11
    12
    13
    14
    15
    16
    17
    [
    {
    "request" :
    {
    "uri" : "/users/2",
    "method": "post",
    "json": {
    "name": "Yong"
    }
    },
    "response" :
    {
    "status" : "500",
    "text" : "Internal Server Error"
    }
    }
    ]

    2) Create another js file named “user2_test.js”, and add following into its content:

    1
    2
    3
    4
    5
    6
    7
    8
    9
    10
    11
    12
    13
    var should = require('chai').should(),
    expect = require('chai').expect,
    supertest = require('supertest'),
    api = supertest('http://localhost:3000');
    describe('User', function() {
    it('should return a response with HTTP code 500 and its content if request the gender of "Yong" as "name"', function(done) {
    api.post('/users/2').set('Accept', 'application/json').send({name:"Yong"}).expect(500).end(function(err,res){
    if (err) return done(err);
    expect(res.error.text).to.equal("Internal Server Error");
    done(err);
    });
    });
    });

    3) Once you run the test script, it will show:

    1
    2
    3
    4
    User
    ✓ should return a response with HTTP code 500 and its content if request the gender of "Yong" as "name"
    1 passing (41ms)

    4) If we only change the expected HTTP status code in the test script to 404, the result will be:

    1
    2
    3
    4
    5
    6
    7
    8
    User
    1) should return a response with HTTP code 500 and its content if request the gender of "Yong" as "name"
    0 passing (45ms)
    1 failing
    1) User should return a response with HTTP code 500 and its content if request the gender of "Yong" as "name":
    Error: expected 404 "Not Found", got 500 "Internal Server Error"

    5) And if we only change the expected response message to “Not Found”, the result will be:

    1
    2
    3
    4
    5
    6
    7
    8
    9
    10
    11
    12
    13
    User
    1) should return a response with HTTP code 500 and its content if request the gender of "Yong" as "name"
    0 passing (43ms)
    1 failing
    1) User should return a response with HTTP code 500 and its content if request the gender of "Yong" as "name":
    Uncaught AssertionError: expected 'Internal Server Error' to equal 'Not Found'
    + expected - actual
    -Internal Server Error
    +Not Found

    6) Revert all changes back again, and create another json file named “combined.json”, and add following:

    1
    2
    3
    4
    5
    6
    7
    8
    [
    {
    "include": "user1.json"
    },
    {
    "include": "user2.json"
    }
    ]

    And start the Mock Server using java -jar moco-runner-0.11.1-standalone.jar http -p 3000 -g combined.json

    7) Use Mocha to run all the test scripts:

    mocha *.js

    And you should see:

    1
    2
    3
    4
    5
    6
    7
    User
    ✓ should return a response with HTTP code 200, and the response text should be "Male" if request the gender of "Yale" as "name"
    User
    ✓ should return a response with HTTP code 500 and its content if request the gender of "Yong" as "name"
    2 passing (49ms)

    8) If you want to run a single test script to test all steps, you can create a js file named “users_test.js”, and add following content:

    1
    2
    3
    4
    5
    6
    7
    8
    9
    10
    11
    12
    13
    14
    15
    16
    17
    18
    19
    20
    21
    var should = require('chai').should(),
    expect = require('chai').expect,
    supertest = require('supertest'),
    api = supertest('http://localhost:3000');
    describe('User', function() {
    it('should return a response with HTTP code 200, and the response text should be "Male" if request the gender of "Yale" as "name"', function(done) {
    api.put('/users/1').set('Accept', 'application/json').send({name:"Yale"}).expect(200).end(function(err,res){
    expect(res.body).to.have.property("gender");
    expect(res.body.gender).to.equal("Male");
    done(err);
    });
    });
    it('should return a response with HTTP code 500 and its content if request the gender of "Yong" as "name"', function(done) {
    api.post('/users/2').set('Accept', 'application/json').send({name:"Yong"}).expect(500).end(function(err,res){
    if (err) return done(err);
    expect(res.error.text).to.equal("Internal Server Error");
    done(err);
    });
    });
    });

    9) Run the test using mocha users_test.js, it will show the same result as above.

Tips:

  1. If you want to test against OAuth protocol, you need to change SuperTest to unirest. Thanks to QiLei.

Later on:

Since you already can run your test scripts smoothly through command line, you can simply add them to CI tools, such as Jenkins and such.

Have fun!

You can find all the test scripts from here.
Quick start for appium (iOS and Android)

There are many changes compared to the early version of appium, so I would like to start from scratch to build a simple testing script for appium. For further reading about how to apply Page Object and BDD to appium, you can read my previous article Cookbook for appium and BDD with PageObject.

Environment Settings:

  1. Install XCode and its command line tool.

    To install XCode command line tool, you can use the following command in Terminal:

    xcode-select --install

    And download the OS versions you want to work with.

  2. It’s better to choose Ruby to write the test script as it’s easy to get familiar with. And to install/upgrade it, we can use following commands:

    1) Install Homebrew

    /usr/bin/ruby -e "$(curl -fsSL https://raw.githubusercontent.com/Homebrew/install/master/install)"

    2) Install Ruby

    brew install ruby

  3. Install appium and related gems:

    1
    2
    3
    4
    5
    6
    7
    8
    9
    10
    11
    12
    brew install libimobiledevice --HEAD
    brew install node
    npm install -g ios-deploy
    sudo gem install xcpretty
    npm install appium-doctor -g
    npm install -g appium
    npm install wd
    npm install appium-xcuitest-driver
    brew install carthage
    gem install --no-rdoc --no-ri bundler
    gem install --no-rdoc --no-ri appium_lib
    gem install --no-rdoc --no-ri appium_console
  4. Install JDK for Android:

    Download from Java SE Development Kit 8 - Downloads and install.

  5. Install Android Studio from Download Android Studio and SDK Tools | Android Studio and download the OS version you want to work with.

  6. Configure the bach_profile to set environment parameters:

    Edit your ~/.bash_profile, if you don’t have one, just create it and add following lines to it:

    1
    2
    3
    4
    5
    6
    7
    8
    export ANDROID_HOME=/Users/$your_name/Library/Android/sdk
    export ANDROID_SDK=$ANDROID_HOME
    PATH=$PATH:$ANDROID_HOME/build-tools
    PATH=$PATH:$ANDROID_HOME/platform-tools
    PATH=$PATH:$ANDROID_HOME/tools
    export JAVA_HOME="`/System/Library/Frameworks/JavaVM.framework/Versions/Current/Commands/java_home`"
    PATH=$PATH:$JAVA_HOME/bin
    export PATH
  7. Run appium-doctor in Terminal to see if everything works fine. (You need to see there are all green.)

Generate the apps to be tested:

  1. Download the iOS UIKit Catalog source code from UIKitCatalog.

    1) Unzip it and open the project in the Swift folder.

    2) Build it in XCode by selecting the OS version you would like to test.

    3) Expand the “Products” folder in the project structure, and select the app generated.

    4) Right click it and select “Show in Finder”, and copy the app with extension as .app to your test folder for future use.

  2. Download the “TextSwitcher” from “Import an Android code sample” in Android Studio welcome screen.

    1) Change the “minSdkVersion” from 7 to 9 in “build.gradle (Module:Application)” and build the app.

    2) Right click the root of project structure and select “Reveal in Finder”, and copy the app with extension as .apk in “/Users/$your_name/AndroidStudioProjects/TextSwitcher/Application/build/outputs/apk” to your test folder for future use.

Identify elements using appium GUI:

  1. Download the appium GUI through their website;

  2. Start appium GUI after install;

  3. Start the server by default;

  4. Start a new session;

  5. Input all capabilities you want to use in “Desired Capabilities”, such as:

    1
    2
    3
    4
    platformName text iOS
    platformVersion text 10.2
    deviceName text iPhone 7
    app text /Users/$your_name/Documents/UIKitCatalog.app

    Above shows the basic capabilities you must pass to appium to run the app. (For Android, it’s basically the same, unless you first activity is not MainActivity so you need to set “appActivity” pointed to the right one.)

  6. Then you can actually “Start Session”. (For Android, you need to start your emulator before this, appium won’t automatically start Android emulator like it does for iOS.)

  7. Wait for some time, another window would popup. In this window, you should see the app’s visual and could inspect elements in it.

  8. Once click the element on app UI in the inspector window, you can see the properties of the element shows on the right side.

    1) Try to use id to locate element as possible.

    2) The “Tap”, “Send Keys” and “Clear” button in the right “Selected Element” panel will simulate the corresponding action, and you will see the consequences in the app UI.

    3) You can use “Back” on the top of this window to simulate hardware Back action, and next to it is Refresh.

    4) The eye icon is very useful if you would like to record all your steps into a script. Any action after you click that icon will be recorded, until it’s been clicked again.

    5) You can choose the language you want to record, and you can select to show/hide the supporting code (the code to support you start and end tests rather than the test steps), copy and delete the test codes.

    6) The last one on the top will close this window and entire session.

  9. With the inspector, you have recorded some script, or you have written your own code with the inspector to locate elements. The code should look like following:

    1
    2
    3
    4
    5
    6
    7
    8
    9
    10
    11
    12
    13
    14
    15
    16
    17
    18
    19
    20
    require 'rubygems'
    require 'appium_lib'
    caps = {}
    caps["platformName"] = "iOS"
    caps["platformVersion"] = "10.2"
    caps["deviceName"] = "iPhone 7"
    caps["app"] = "/Users/$your_name/Documents/UIKitCatalog.app"
    opts = {
    sauce_username: nil,
    server_url: "http://localhost:4723/wd/hub"
    }
    driver = Appium::Driver.new({caps: caps, appium_lib: opts}).start_driver
    driver.navigate.back
    el1 = driver.find_element(:xpath, "//XCUIElementTypeCell[14]")
    el1.click
    el2 = driver.find_element(:xpath, "//XCUIElementTypeCell[1]/XCUIElementTypeTextField")
    el2.send_keys "123"
    el3 = driver.find_element(:xpath, "//XCUIElementTypeCell[2]/XCUIElementTypeTextField")
    el3.send_keys "456"
    driver.quit

    Save the script to a .sh file, such as test.sh.

Run appium test:

  1. Now we can run the script through the command line (Terminal).

  2. After we close appium GUI, we need to run appium in a Terminal tab, then open your test folder. Under the folder, run following command:

    ruby test.sh

  3. You should see the simulator started and test runs.

  4. But we DO NOT have any assertion. Let’s add some.

    1) Install RSpec through

    gem install rspec

    2) Include RSpec and its matchers in the “Require” section

    1
    2
    3
    4
    require 'rubygems'
    require 'appium_lib'
    require 'rspec'
    include RSpec::Matchers

    3) Add assertions to the test, like:

    1
    2
    3
    4
    5
    6
    7
    8
    9
    driver.navigate.back
    el1 = driver.find_element(:xpath, "//XCUIElementTypeCell[14]")
    el1.click
    el2 = driver.find_element(:xpath, "//XCUIElementTypeCell[1]/XCUIElementTypeTextField")
    el2.send_keys "123"
    el2.value.should == "123"
    el3 = driver.find_element(:xpath, "//XCUIElementTypeCell[2]/XCUIElementTypeTextField")
    el3.send_keys "456"
    el3.value.should == "456"

    4) To make sure the assertions really works, we can alter like:

    el3.value.should == "345"

    5) And run it again, it should show following in Terminal:

    1
    2
    /usr/local/lib/ruby/gems/2.4.0/gems/rspec-support-3.6.0/lib/rspec/support.rb:87:in `block in <module:Support>': expected: "345" (RSpec::Expectations::ExpectationNotMetError)
    got: "456" (using ==)

    6) Now we can revert the change, and complete the test script.

    7) The final test script should looks like:

    1
    2
    3
    4
    5
    6
    7
    8
    9
    10
    11
    12
    13
    14
    15
    16
    17
    18
    19
    20
    21
    22
    23
    24
    require 'rubygems'
    require 'appium_lib'
    require 'rspec'
    include RSpec::Matchers
    caps = {}
    caps["platformName"] = "iOS"
    caps["platformVersion"] = "10.2"
    caps["deviceName"] = "iPhone 7"
    caps["app"] = "/Users/yhuang/Documents/appium/UIKitCatalog.app"
    opts = {
    sauce_username: nil,
    server_url: "http://localhost:4723/wd/hub"
    }
    driver = Appium::Driver.new({caps: caps, appium_lib: opts}).start_driver
    driver.navigate.back
    el1 = driver.find_element(:xpath, "//XCUIElementTypeCell[14]")
    el1.click
    el2 = driver.find_element(:xpath, "//XCUIElementTypeCell[1]/XCUIElementTypeTextField")
    el2.send_keys "123"
    el2.value.should == "123"
    el3 = driver.find_element(:xpath, "//XCUIElementTypeCell[2]/XCUIElementTypeTextField")
    el3.send_keys "456"
    el3.value.should == "456"
    driver.quit
  5. Now it’s all done.

Please Note:

  1. This is just a sample to run test, but we actually should write it in BDD way with Page Object.

  2. It should also be integrated with CI.

  3. If you want to use Appium to test Android, I recommend you to use Genymotion rather than AVD, even you are using x86 kernel for AVD.

  4. You can reference to the app and script for UIKitCatalog and the app and script for Android Calculator.

国内交付项目新手PM生存指南

长期以来一直做国外的交付项目,对于国内的项目总是很怵,因为总觉得做国内项目就需要像电视剧中一样边谈项目边喝酒应酬,而且还天天加班,所以一直以来没有机会也没有勇气接近国内项目。

但是,机缘巧合,最近在国内项目上摸爬滚打了一段时间,感觉可以把自己的经历和经验记录下来,跟大家分享一下。

也许大家接触的都是国内客户,但是不同的客户会有自己独特的风格,在下文中我会按照交付项目开展的时间顺序为大家介绍它们通用的和特有的问题及经历。

#售前阶段

在正式开始项目前,我们需要对项目管理的“金三角”(时间、范围和成本)有明确的认识。但是在售前阶段这些问题的答案都很模糊,需要我们逐步分析和确认。

一般会通过以下三个步骤来解决。

###第一步:了解背景

我们首先需要做的是找到这个项目机会的来源,也就向销售的同事获取尽可能多的信息,例如这个机会是哪个客户给的,他/她在客户组织架构中的位置是什么样的,他/她对我们有什么样的建议和想法,这个机会所在部门的背景情况和重视程度,这个项目现在遇到的问题和以后有可能遇到的问题,我们去谈需求时需要联系谁,联系方式是什么。

拿到了这些消息后,我们还可以利用现有的信息,在公司内部找和客户同一部门或者类似部门打过交道的同事了解更多的背景和技术知识,尽可能找一个在同一客户下工作过,最好是客户熟知并且对客户有影响力的同事,在洽谈需求时能一起参加,这不仅会让我们更有底气,能更准确地了解客户需求,也会让客户增加更加信任。

这些信息我们最好能够记录并保存下来,而且需要系统性地整理这些信息及注意事项。

在这一阶段我们了解的更多都是全局的内容,而在项目中我们往往忽视了从全局观出发,如何能更好地解决问题。

###第二步:拜访客户

有了这些信息,下一步就是和客户约好时间,进行拜访

第一次进行客户拜访,通常双方需要先进行相互介绍,我们一般也会派出项目的PM和Tech Lead参与拜访,拜访的内容主要是了解需求。但是第一次谈需求,我们需要注意更多从业务和价值角度切入,而不要陷入技术细节。这时我们往往会发现自己之前设想的和客户描述出来的差别很大。但是我们要注意,不要过于坚持自己的想法,而需要根据客户的描述,通过自己的问题一步一步地引导客户说出他们的痛点和期望,从而能使项目的目标清晰。

在这一阶段通常我们也要向客户展示我们的技术实力,让客户坚定选择我们的决策是正确的。采取的方式可以有针对项目相关技术的演讲或者演示。总的来说,最好把第一次拜访控制在一个小时左右,这样我们一方面得到了相关的项目知识,另一方面,为下一次会面向客户展示具体的项目相关技术实力提供了机会。

在有了项目业务需求和痛点之后,我们需要修正自己之前的想法和设计,根据最新的情况进行总结,并且最好得到客户的确认。

接着,根据这些信息,我们就可以着手进行技术架构的设计以及风险的评估,为后续的拜访明确目标,使会议更高效。之后的拜访或者会议都是一步一步的细化过程,包括确定是用什么技术栈,什么架构,客户如何与我们交付团队合作等等。不过我们需要控制每次会议以及为项目准备时间的投入,以及这一阶段持续的时间。因为持续时间长不仅会让客户感觉我们不专业,也会暗示我们不理解项目。再说,如果项目最后没有谈成,也是对于公司资源的浪费。

###第三步:合同形式

上面我们说的都是技术方面的,售前阶段有很重要的一点是需要了解客户想以什么样的方式和我们签合同。因为咨询和交付项目的工作方式以及交付物都是不一样的,如果我们以交付项目的形式签订合同,而以咨询的形式工作,那在项目结束时,我们会面临如何验收,如何提供交付物的问题。这也很有可能让客户在工作验收和领导汇报时陷入被动,因为实际完成的和合同上签署的内容是不一致的。

如果我们能够顺利解决上面所说的问题,我们就可以等着进行投标等工作了。下面我们就来看看神秘的投标阶段都会有什么意想不到的问题吧。

#投标阶段

首先我们需要根据标书的要求,完成相关系统的设计。这些设计并不只是技术架构,还需要包含对于客户的理解,对于项目现状的理解,对于项目远景的理解,以及由此而产生的技术架构和实施计划。同时,我们还需要展现我们对于同一类型项目的经验和成功案例。

编写标书的技术方案看起来简单,只要写命题作文就可以了。

标书的大致目录

图 1.1 - 标书的大致目录

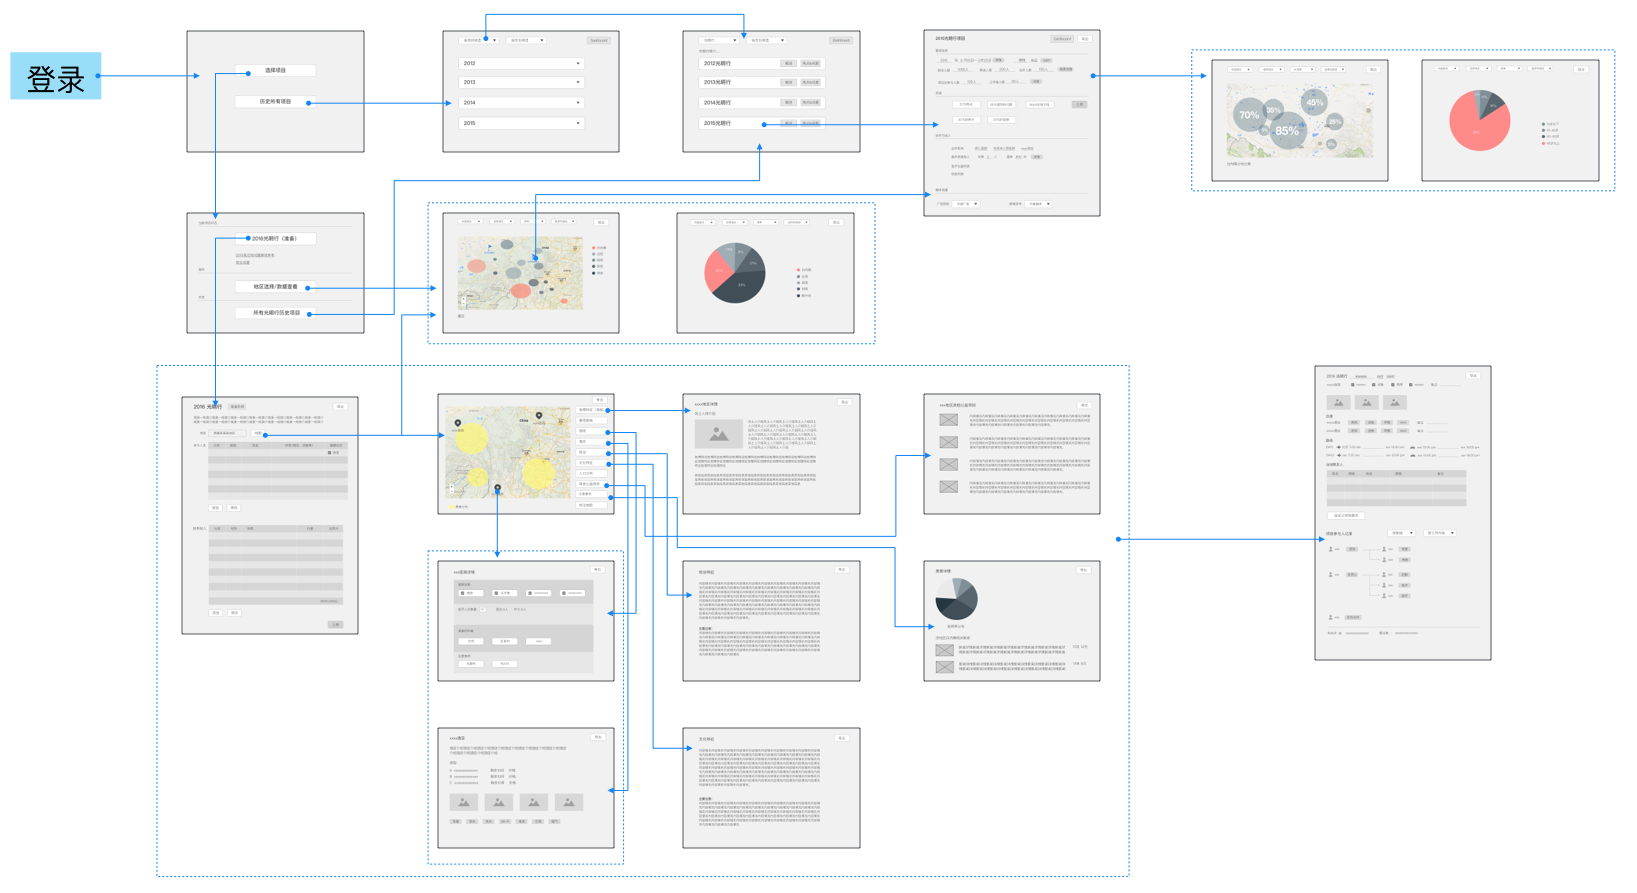
但是,标书需要我们协同配合,尤其是需要售前同事和交付团队进行密切沟通,确保交付团队在得到客户真实意图,准确把握客户的期望和优先级的情况下,出具架构合理、充分考虑到客户需求和成本的方案。如果在投标前期给客户做过Inception,我们还需要和Inception团队全力合作,进行知识的有效传递(最好能让Inception团队来编写标书)。如果能从Inception的团队中获得例如线框图(如图1.4),用户画像,用户旅程,推荐的技术架构甚至Epic Story,对于确定项目范围和编写技术方案来说会助力很多。

线框图和用户旅程

图 1.2 - 线框图和用户旅程

###关键点一:技术栈和技术架构

在编写标书时的关键之一在于技术栈和技术架构。在我们根据客户的需求确定这两项之后,我们还需要进行架构评审,以便集思广益,减少架构设计时引入交付风险,同时也可以更好的权衡交付压力和技术卓越。我们不仅需要考虑使用什么技术来满足客户的需求,还需要考虑客户运行项目的成本,甚至客户是否需要付出很多成本招聘到合适的运维人员等。

技术架构

图 1.3 - 技术架构

###关键点二:估算工作量

确定了技术栈和技术框架之后就需要对工作量进行估算了。在进行估算时我们不能按照特定的人员能力进行估算,而需要按照平均开发水平估算交付项目的人天,因为我们不能确定谁来进行开发。由于和客户签订合同通常是以人天为单位进行计算的,所以按照我们通常使用的以难易程度为点数进行估算也是可以的,不过最后也需要转换成人天。在估算出工作量之后还需要和售前同事权衡架构设计的精密性和交付周期。此外,对于有些客户,我们评估了工作量后,还需要和他们针对每一个功能的工作量进行PK,确定我们的工作量没有水分,因为我们更需要对项目业务和技术都有深入的了解。

###关键点三:确定人员计划

编写标书的另一个关键是确定人员计划,但是这一点依赖于前面两项。在确定了技术方案后,我们需要根据具体的技术需求,确定需要什么样的角色,例如使用什么技术的前后端开发,是否需要iOS/Android的开发,是否需要UX等;以及根据对于交付项目的工作量估算,确定这些人员上项目和下项目的时间,并且最好能留一点buffer,以应对需求变化和请假等不确定因素,同时还需要考虑到项目交付后一段时间的维护计划。项目的利润也是PM需要重点关注的,这也会影响到选什么样的人加入项目。由于我们通常并不会获得完全适合项目技术的人员参加项目,所以作为PM也得负责人员的培养,以达到项目的要求。

人员计划

图 1.4 - 人员计划

此外,我们不仅需要充分考虑以上三个方面,还需要突出我们的亮点,使客户能更直观地了解我们的价值所在。

在编写标书前我们就得设定好心理预期,编写标书,尤其是第一次编写标书时,通常都会有很多地方都要修改很多遍。虽然修改很累很繁琐,但是只有做好了这一步,才能让后续工作更顺利。

##讲标阶段

投标不仅包含编写标书,还包括讲标的环节。两者中间实际上还有“投标”这一活动,但是一般是由特定的同事去投标的,所以作为PM和技术人员,通常在这一阶段更关注于投标之后的讲标。

顾名思义,讲标就是在客户现场把投递的标书讲一遍。但实际上前后的准备工作都很多。

首先,我们要准备讲标标书。大家会觉得奇怪,刚才不是写好标书都投了吗?还写什么讲标标书啊?其实一般投标的纸质版标书会有150~200页的内容,而讲标时间通常都是半小时,再加上15分钟左右的问答,所以在30分钟内不可能讲完标书上的所有内容,因此我们需要对标书进行精简,并且多以图表和图片的形式进行展示。这一过程也会和编写标书一样会修改很多次。

其次,还需要进行讲标的演练。需要有人模仿客户,提出各种问题和挑战,让讲标的同学尽可能做好应对各种不同的听众和情况,随机应变,使整个讲标过程在控制中。同样演练也会进行多次,以使演讲技巧和临场能力得到锻炼。

再次,在正式讲标前,我们需要准备好电脑电源,翻页笔,显示器转接头,装有讲标文件的优盘,各种格式的讲标文件(Keynote、PPT、PDF等)等设备和资料,避免任何出错的可能。并且我们需要提前到场,如果离客户远一定要留好充足的时间,避免迟到而影响讲标效果。

最后,在讲标时,我们只要控制好节奏,把握好时间,按照演练的内容正常发挥就可以了。

在投标和讲标之后是商务谈判和签订合同等活动,由于一般大家都不会接触(其实是本人并没有接触到),所以就略过啦。

等前期准备都完成了,就可以开始正式的交付阶段了。

#交付阶段

在交付阶段作为PM关注的点很多,所以分为几个方面来说。

###在这一阶段,我们还需要和客户沟通了解以下方面:

  1. 了解客户项目的上线流程:比如上线是否需要申请域名,是否有上线前的测试和安全检查等,内部工作流程和规范(需要使用的各种工具,以及是否每次会议结束后都需要发送会议纪要等),文档和报告(日报,周报以及项目交付时需要提供的诸如用户手册、维护指南等文档)。

  2. 了解客户如何定义项目成功:因为对于客户的业务部门、技术部门和我们交付团队,成功的定义并不一样,但是需要我们了解这些不一致,然后相互协调相互妥协,尽量让各方都满意,使项目在交付后每一方都认为项目成功了。

  3. 为客户提供统一的接口人:这并不是说交付团队只有PM和客户沟通而是说不同类型的事物至少客户可以找同一个人解决问题,而不是每次遇到问题,都是需要通过询问才能找到合适的人解决,甚至没有人负责解决问题。例如对于项目管理和人员安排,客户可以找PM;而对于技术架构和实现方面的问题,可以找Tech Lead。

除了了解上述方面,对于客户,尤其是业务部门,通常来说对于交付团队来说都很不放心,担心进度和实现效果。特别是对于第一次合作的团队来说更是如此。那我们能怎么样改变这种情况呢?

  • 首先我们可以通过每天的站会让客户了解我们工作的内容,也便于我们快速解决问题。不过我们需要控制站会的形式,不能把站会变成向汇报或者进行提问的方式。

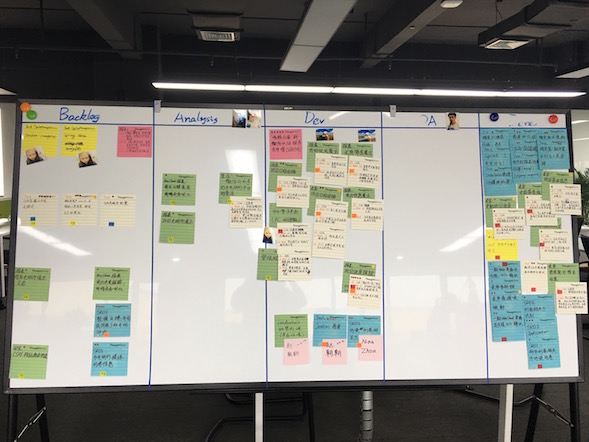
  • 其次我们可以通过故事墙(物理和电子的)让客户实时看到项目的进展和项目的状态,让他们觉得项目可控。

  • 再次是需要适时而且适度向客户寻求解决问题。这样可以让客户更有参与感和成就感,不过需要控制好度。尽量避免交付团队自己开小会,让客户觉得自己被排除在团队之外。

其实,最关键的还是我们开发的软件。不仅是客户,交付团队也是看到了实际的产品之后,才会对项目进度和质量更有信心。

###对于我们自己团队来说,需要注意以下几点:

  1. 和很多公司不同,我们开始交付之后,并不是一上来就直接开发功能,而是会有迭代0的环节,包括交付范围的细化,迭代1的故事卡分析,制定发布计划,进行基础设施的搭建,验证技术可行性等任务。这可以让我们在项目伊始就尽量排除、发现和识别架构和框架以及技术可行性上的问题,迅速进行调整。

  2. 我们还需要和客户建立良好的关系,让他们意识到我们是在为同一个目标而努力,需要通力合作才能达到那个目标,所以各方需要相互配合与磨合。

  3. 在坚持底线和原则的基础上适当妥协,尽量保证客户的满意度。但是在无法满足或者对于项目进度、质量、人员、成本以及和客户的关系有影响的方面,需要及时和交付保障的同事进行沟通和商量,尽量在萌芽阶段解决问题。

  4. 关注并管理客户的期望。如果项目开发慢了,要及时向客户解释原因,并提供解决方案以及寻求帮助;如果交付快了,不仅需要介绍我们通过何种努力才能加快进度,同时需要介绍可能存在的问题以及可以改进的内容。

  5. 在开发过程中控制好项目的节奏,不能让团队一直加班或者没有事做,而需要让工作有节奏。对于客户可能提出的996(9点上班,9点下班,每周工作6天)的工作模式,一定要断然拒绝,因为我们希望的是可持续的高效开发,而不是短期的突击。当然这不包括上线前可能会需要加班的突发情况。

  6. 为了更好的合作,我们还需要在项目开始就和所有团队成员达成一致,定义内部工作流程,以及内部沟通机制,例如微信群和邮件群等。不过需要注意使用的频率,减少客户对于进度的担忧。此外对于和客户的沟通,我们也需要制定沟通计划,例如如何与客户确定需求等内容,什么时候给客户进行演示,以及客户有问题该怎么和团队沟通,以保证既能解决问题,又不会影响团队交付进度。

  7. 我们合作的很多客户对于文档都是有不少要求的,所以在开发过程中,由于交付压力,客户有可能允许我们延期提交相应的文档,例如设计文档等,但是我们还需要保留好原始材料,等客户需要这些文档时,我们可以通过这些材料快速生成相应的内容,而不是重新做起。

###对于PM来说还有哪些职责呢?

  1. PM还需要适当屏蔽干扰,让团队能集中精力工作,例如尽量减少不相关会议的打扰,以及回答客户随时提问技术细节等情况;同时需要避免压力过多传递到团队成员,例如客户对于需求或者架构的大改变,从而有可能对项目交付进度产生很大压力,PM需要先过滤这些信息,等改变明确后再告知整个团队,这样可以避免传递不确定的信息,避免造成军心不稳的情况。

  2. PM还需要关注团队成员的精神状态,用积极的方式影响团队,提高团队士气;同时还要负责好后勤工作,例如开发所需要的各种资源的协调,办公用品等,以及Team Building这些活动。

  3. 交付团队还需要不时给客户一定的震撼和影响,以使客户对我们更信任。例如采用客户并没有用过的利用画图的方式展示架构图;

用画图的形式展示架构图

图 1.5 - 用画图的形式展示架构图

以及,可以用美纹胶带来装饰物力墙,而不是在白板上手动画上歪歪扭扭的线;

用美纹胶带来装饰物力墙

图 1.6 - 用美纹胶带来装饰物力墙

也可以是针对技术问题的在白板上边画边讲的讨论等。

  1. 如果在客户现场工作,客户一般会希望通过学习我们的工作方式提高自己员工的能力,所以我们也可以考虑在不影响进度的情况下,传播一些项目实践,例如举行公开的回顾会议等。

  2. 在客户现场工作需要注意客户的网络速度和质量是否会影响到我们的工作效率。如果发现了问题,一定要尽早解决,尤其是安装开发和生产环境的任务对于网络要求会很高。

虽然现在我经历的第一个国内交付项目还正在如火如荼地进行,但是并不妨碍我畅想一下交付之后的情形。

#交付之后

在项目完成以后,我们还会维护一段时间。这段时间只会就现有的代码问题进行修复,并不会进行功能开发。

对于PM来说,

  1. PM需要发送上线邮件,让团队成员有成就感和荣誉感,也让更多人知道自己项目是做什么的。

  2. PM还需要负责项目总结,不仅总结成功的经验,还需要分析出现的问题以及如何避免,让更多的人少走弯路。

  3. 最后少不了的就是团队的庆祝了,无论是买蛋糕庆祝还是别的活动,团队都需要被激励和感谢。

之后,大家又可以准备投入到新的项目中啦:)。

以上的总结更多的是从个人的经验出发,难免会有不足,希望这边文章能使大家在看的时候想到自己遗漏的一些内容,更好更完善地进行项目管理。也欢迎大家的指正。

移动 app 云测试平台的对比与分析

我们都知道在测试移动app时最耗时的是在各种测试设备进行测试, 因为不论是安卓还是iOS都已经碎片化了。而云测试看似是解决这一问题的有效途径。因此选择哪种云测试平台来协助测试人员进行各种测试就成为首要问题。

###我们先来看看云测试平台通常都提供哪些功能和服务。

主流的云测试平台都支持对原生native,混合hybrid和Web app的测试,这些测试包括:

  1. 兼容测试

    通过在多种测试设备上安装/卸载和运行被测app,遍历app的每个界面,主要检查app是否会报错或者崩溃。有些云测试平台还会对每个页面进行截图并进行对比。

  2. 脚本测试

    通过运行云测试平台工具进行录制的或者使用自动化测试框架编写的自动化脚本,实现模拟用户操作的目的,并且减少手动测试时间。

  3. 性能监控和分析

    利用Android SDK提供的借口,云测试平台可以检测移动app的耗电量,CPU等资源占用率,使用的流量等信息。有些云测试平台还提供自己的SDK,整合在app中可以提供更为准确的性能指标和信息,包括线上app的性能信息以及崩溃信息等。

  4. 手动测试和人工测试

    云测试平台的手动测试是指租用云测试平台的特定设备,测试人员手动登录设备进行测试。而人工测试则是将测试需求告知云测试平台的专业测试人员,雇佣他们临时作为自己的测试人员进行测试。

  5. 持续集成

    不少提供脚本测试的云测试平台都同时提供对持续集成(Continuous Integration)环境的支持。

此外不少国内云测试平台还提供以下功能:

  • 安全测试
  • 内测托管分发
  • 众包测试

###我们再来看看各种云测试平台对于上述功能和服务的支持情况。

由于国内外的云测试平台使用环境等因素的不同,我们分别对国内外主流的几个云测试平台进行对比。

####国外主流的云测试平台:

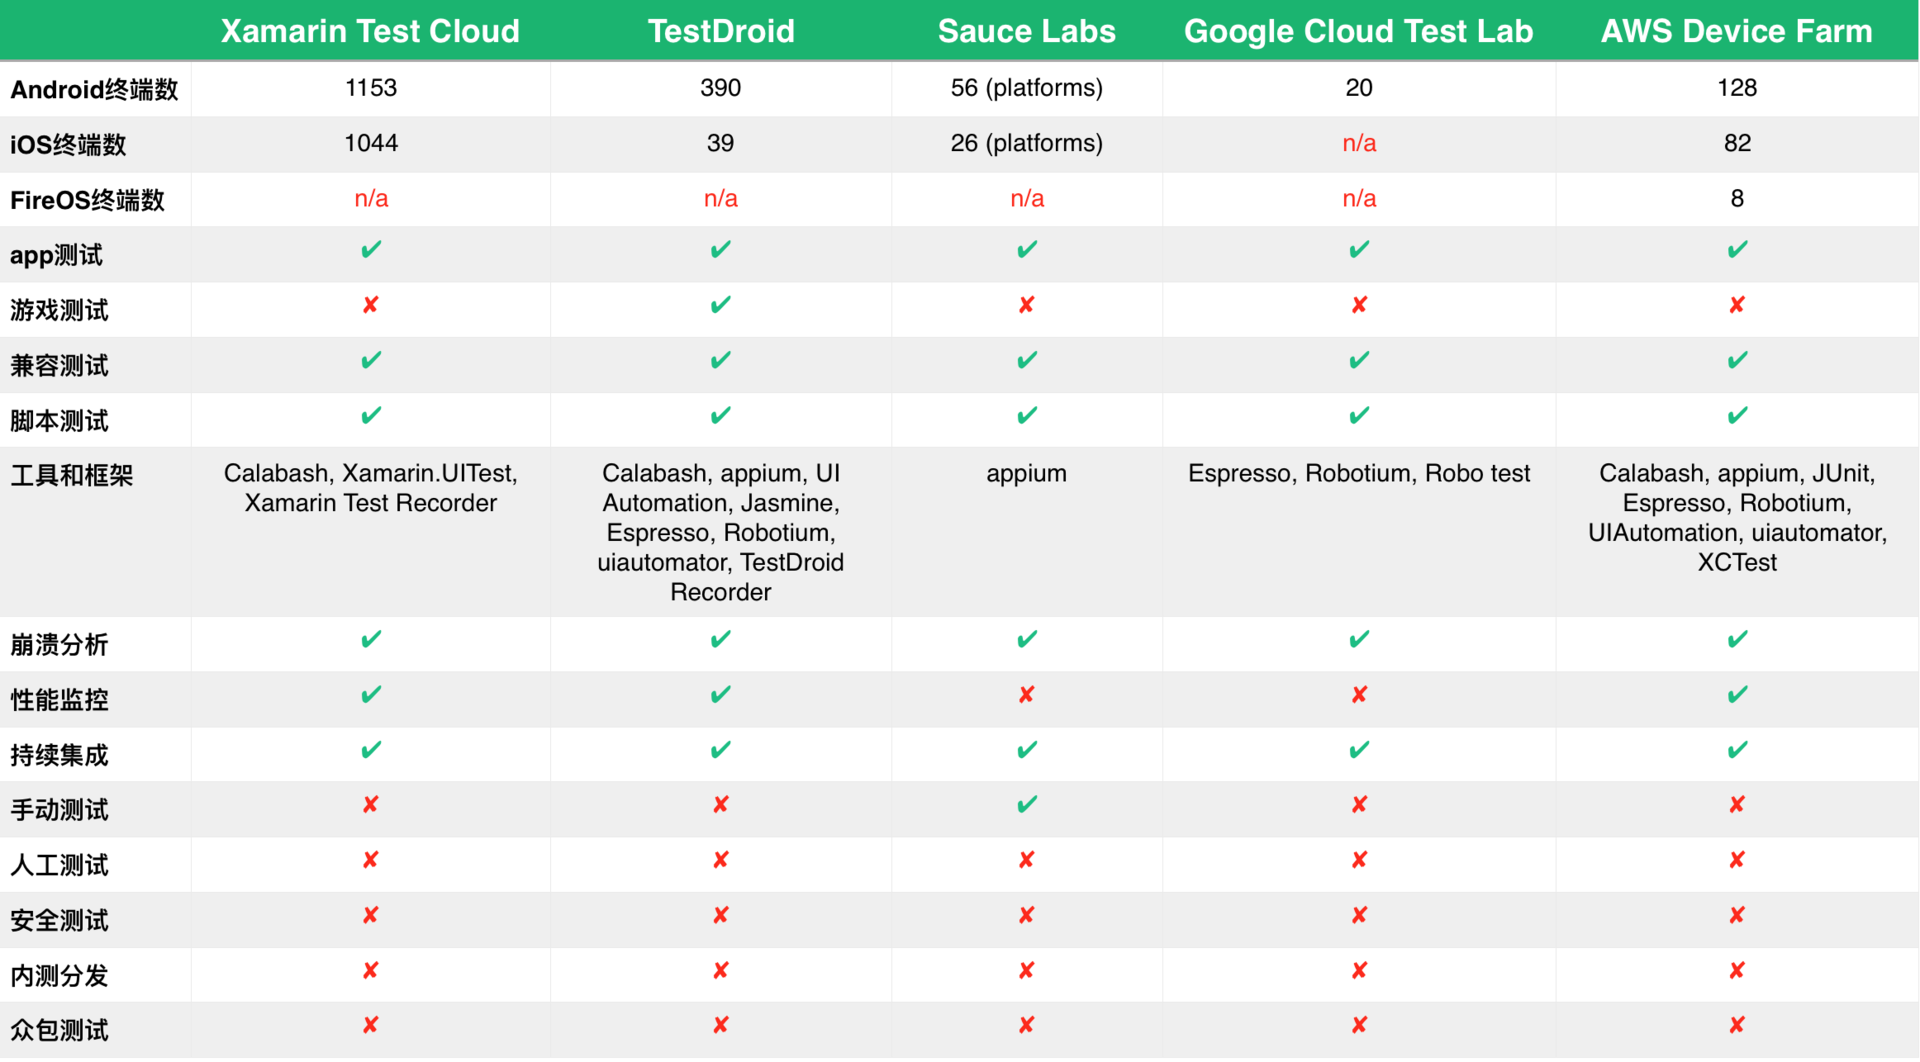
图1 - 国外主流的云测试平台对比

从上图我们可以看到一些特点:

  1. 在测试设备的数量上,Xamarin Test Cloud和Sauce Labs都是非常有优势的,虽然Xamarin Test Cloud统计的是测试设备的数量,而Sauce Labs是平台的数量;

  2. 亚马逊自己的FireOS只被自己的云测试平台支持,在国内我们也能看到类似的例子;

  3. 所有的云测试平台都支持app测试,但是只有TestDroid支持游戏测试;

  4. 对于国内云测试平台提供的人工测试,安全测试,内测分发和众包测试,国外这些云测试平台都是不支持的,需要结合别的工具和框架进行使用。不过对于手动测试,Sauce Labs和Perfecto这两个云测试平台支持租用测试设备进行手动测试;

  5. 对于云测试基础功能的兼容测试,以及脚本测试,崩溃分析和持续集成,这些云测试平台都是支持的;

  6. 只有Xamarin Test Cloud,TestDroid和AWS Device Farm支持性能监控;

  7. 对于脚本测试所使用的移动app自动化测试框架,每个平台都不甚相同:

    • Xamarin Test Cloud支持Calabash(iOS和Android)和自己的Xamarin.UITest;

    • TestDroid支持很多框架,包括支持iOS的Calabash,appium,UI Automation和 Jasmine,以及支持Android的Calabash,appium,Espresso,Robotium和uiautomator;

    • Sauce Labs支持自己的开源框架appium;
    • Google Cloud Test Lab则支持Espresso,Robotium和Robo test;
    • AWS Device Farm也支持很多框架,包括支持iOS的Calabash,appium,UIAutomation和XCTest,以及支持Android的Calabash,appium,JUnit,Espresso,Robotium和uiautomator。
  8. Xamarin Test Cloud,TestDroid和Sauce Labs都有自己的移动app测试脚本录制工具,分别是:Xamarin Test Recorder,TestDroid Recorder和appium inspector。

综合来看,对于国外的云测试平台,如果侧重的是测试设备的覆盖程度,选择Xamarin Test Cloud和Sauce Labs会更合适;如果需要测试FireOS设备,那就选择AWS Device Farm;如果侧重的是脚本测试中支持的语言和框架,那就可以选择TestDroid和AWS Device Farm;如果是进行游戏测试,只能选择TestDroid;如果要远程连接测试设备进行手动测试,那就需要选择Sauce Labs和Perfecto;如果在测试过程中需要同步监测性能,就不能选择Sauce Labs和Google Cloud Test Lab。

####国内主流的云测试平台:

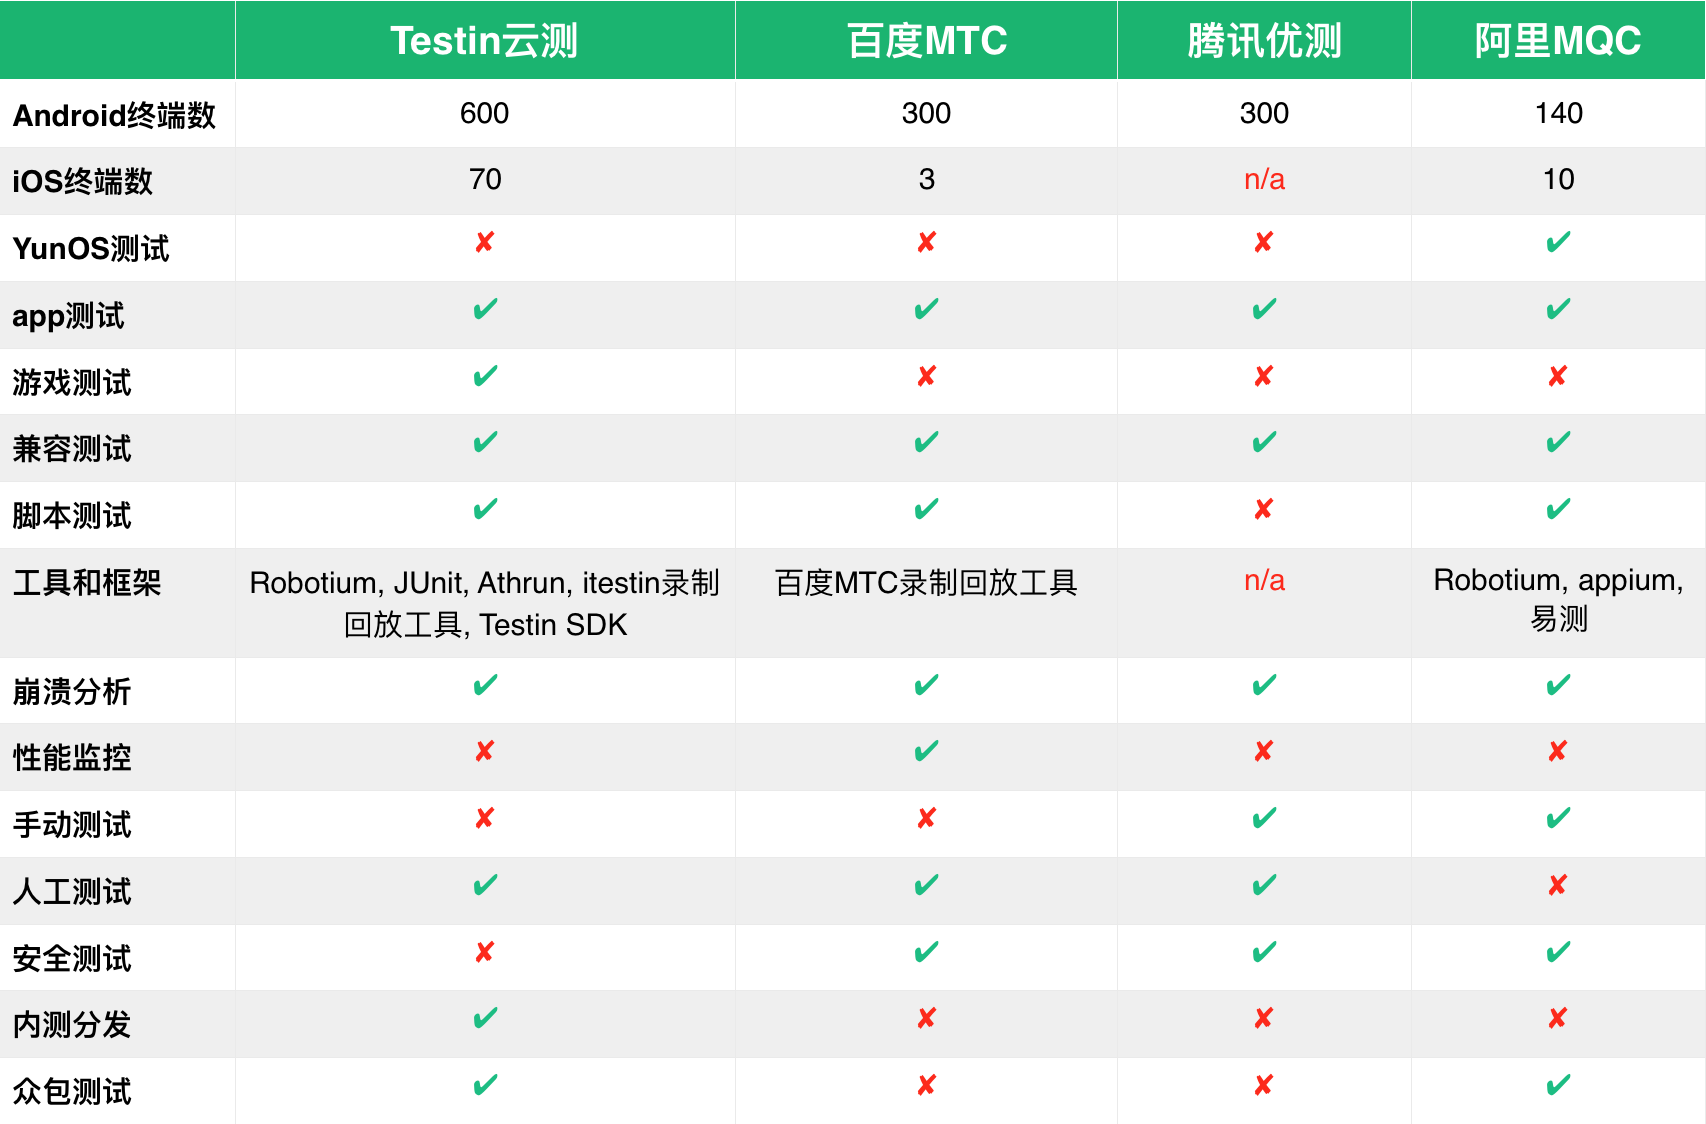
图2 - 国内主流的云测试平台对比

从上图我们也可以看到一些特点:

  1. Testin云测支持的测试设备数量最多,达到了600部Android和70部iOS终端的数量;但是和Xamarin Test Cloud以及Sauce Labs支持的设备数量还是有不少差距的;

  2. 和亚马逊类似,阿里的YunOS也只有阿里MQC才能支持;

  3. 和国外的云测试平台很类似,这四个国内云测试平台也都支持app的云测试,而不支持游戏测试;只有Testin云测支持游戏测试;

  4. 对于云测试基础功能的兼容测试,国内主流云测试平台都是支持的;

  5. 这四个国内云测试平台也都支持崩溃分析,不过对于性能监控,却只有百度MTC支持,而且百度MTC的深度性能测试中还可以做竞品app的性能对比;

  6. Testin云测和百度MTC不支持手动测试;

  7. 只有阿里MQC不支持人工测试;

  8. 只有Testin云测不支持安全测试;对于支持安全测试的云测试平台,也没有公布是如何进行安全测试的;

  9. Testin云测支持内测分发和众包测试,阿里MQC支持众包测试,其它两个云测试平台对于内测分发和众包测试都不支持;

  10. 对于脚本测试,只有腾讯优测不支持;而对于测试工具和框架,各个平台的支持也不相同:

    • Testin云测支持Robotium,JUnit,淘宝的Athrun和Testin SDK,其中只有Testin SDK支持iOS和Android,其他框架都只支持Android;

    • 百度MTC只支持通过自己的测试脚本录制工具录制的脚本;

    • 阿里MQC支持Robotium和增强后的appium,其中appium可以支持iOS和Android;

  11. Testin云测,百度MTC和阿里MQC都提供了自己的测试脚本录制工具,分别是itestin录制回放工具,百度MTC录制回放工具和易测;

  12. 国内云测试平台都没有提及持续集成,不过从笔者的了解看来,Testin云测和阿里MQC应该是都支持的。

对于国内云测试平台,如果需要覆盖更多的测试设备或者需要测试游戏亦或需要内测分发,只能选择Testin云测;如果需要测试YunOS设备,那就需要选择阿里MQC;如果需要进行性能监控和竞品对比,那就选择百度MTC;如果要远程连接测试设备进行手动测试,那就需要选择腾讯优测和阿里MQC;如果需要雇佣云测试平台的专业测试人员,就不能选择阿里MQC;如果需要进行安全测试,就不能选择Testin云测;如果需要进行众包测试,那就选择Testin云测和阿里MQC;如果要进行脚本测试,就不能选择腾讯优测,对于百度MTC也不推荐。

相信通过对比这些云测试平台提供的功能和服务,以及它们各自的特点,读者在选用云测试平台时有了更多的依据。希望大家在使用这些信息作为依据时,综合考虑这些云测试平台的特点,同时可以使用它们提供的免费试用进行尝试,以便验证是否真的适合自己的app。

P.S.以上云测试平台提供的功能及服务,截止于2016年3月20日。

22 Rules In Mobile App Testing

[Translated from my Chinese article.]

Nowadays, with the popularization of mobile devices, mobile apps are widely used everywhere, and lots of companies start business in mobile apps field.

This trend brings the challenges to use: we need to deliver the mobile apps to market in time with high quality, and continuously improve them.

We can categorize mobile apps to native apps and hybrid apps. They have many differences compared with Desktop/Web applications, and testers are encountered with more challenges due to the lacks of testing tool and methodology.

With testing a Telecom mobile portal app for more than 2 years, I have summarized some testing experience and practices for native apps on iOS and Android. And most of them are also useful for testing hybrid apps.

1. Define your testing devices and operation systems

As we all know, the issue of mobile devices’ fragmentation is getting more and more serious, because there are more operation systems with different versions, different hardware of devices, different screen sizes, different resolutions, different pixel densities and etc.

We can’t cover all the devices and operation systems from ROI (Return of Investment) perspective, so we need to choose the testing devices based on the popularization of them in market.

We can not only use Google Analytics or Adobe Omniture to tracking user and generate the devices’ usage report to define testing devices and operation systems, but also read the market share of iOS and Android operation system from their official website:
https://developer.apple.com/support/appstore/, http://developer.android.com/about/dashboards/index.html.

2. Switch between networks

The particularity of mobile app is user always use the app on their way, so when we are conducting our testing, we should also focus on the impact of network switch to app. For example we need to cover the scenario of using app on 3G network and then switch to 4G or Wi-Fi or Airplane Mode and so on.

If the app will authenticated on the mobile network and get a token from it then proceed functionalities forward, we will definitely cover the scenario of switching mobile network to other networks.

When we perform testing on network switching scenarios, we need also pay attention to the error message given to user. The error message should be user friendly, and give user instructions to follow to solve the issues.

3. Multi-tasking

We usually run multiple apps on our mobile devices, so when we testing mobile apps, we need to consider the app switching.

This includes the scenarios of switching app to another, or close app at background, then how app acts when user open it again: should it reload the info when user left, or it will start from scratch?

4. Gestures

Gestures are supported by iOS and Android operation systems, when app introduces it own gestures to user, they would conflict with the system ones.

Such as the wipe gesture to go back introduced in iOS 7: for a long time, to get back one screen, you had to tap the upper left corner on screen (named as “<” or“back” button); on iOS 7, we can swipe the screen to the right and go back.

But before iOS 7 introduced this gesture, many app use this gesture to call out drawer navigation panel in app. At the time when iOS 7 is released, many apps are not ready for this gesture, so when user use this gesture in app, sometimes it will go back, and sometimes it will call out the drawer navigation panel.

Since the user experience for this is so wired, so we should not let this happen from beginning.

5. User experience

As we talk about user experience, we are not only focus on the layout and stuff like that, but also test app’s portrait and landscape display.

And we need to check the level of support to accessibility, so that more people can use our app more easily and freely.

We need also check whether app is following the design guide of iOS and Android official documents. Especially for the apps support both iOS and Android operation systems, it’s better to let each app follow the design guide of corresponding operation system, rather than all apps just follow iOS design guide.

And for the apps embedded Webview, if the Webview is not Responsive designed, it will cause display issues on different devices, therefore we may spend lots of efforts to fix them.

6. Display messages and notifications

Since iOS and Android have different notification methods: on Lock Screen, Status Bar, Notification Center and App Icon, we need to check how the messages display when new message come.

When app use sensors or location services, we should also notify user about the changes.

If we consider the cache mechanism in app, the scenarios will be more complex.

Although using cache, we can reduce the workload of server to provide responses to mobile app client, but it complex our testing: we need to make sure once the message is changed, even the cached message is still valid, we should show the updated message, rather than the cached one.

7. Features of Operation System

Because iOS starts to support widget since iOS 8, and Android supports widget for a long time, so when we are testing mobile apps, we need to consider widget as a serious feature, and prioritize it in features list.

And for Android apps, we also need to verify when apps are installed and running on both Dalvik and ART runtimes.

For iOS, if app allow user to configure its settings in System Settings, we need to test this feature as well.

8. Sync on different devices

Apps like Facebook and Twitter support both iOS and Android; also support multiple devices, such as iPad, iPhone, Android phones and Android tablets.

Some of them allow user to login the same account on different devices. When this happens, we need to check once the message is delivered on one device, this message should be synced to other devices at same time.

9. Customized User Interface

Besides the OS and hardware differences, different devices may also have different user interface installed, such as Samsung’s Touchwiz, HTC Sense, LG UX and Sony Xperia UI.

For example, Touchwiz has different default font compared to Android native font, which may cause your one line sentence displayed in two lines.

And previously on HTC Sense, you will see a menu bar all the time when using an app, this will affect the display of your app.

Also on HTC Sense 4.x, the multi-tasking screen shows the screenshot of apps, but when you open the app, because the app would refresh, so they may have differences between the screenshot in multi-tasking screen and app current view.

10. Support different file formats

Sometime we need to display the legal information in mobile apps, usually the legal file are stored as PDF, so it’s hard for app to support this.

One reason is the PDF is usually designed for web or desktop, when viewing it on mobile devices, it’s hard for user to see, even with zoom in.

Another reason is Android doesn’t provide native support for PDF files, unlike iOS. So if we want to display PDF files to user, we need to figure out whether we need to add support to PDF, or we just let user to download one PDF viewer app to open the legal files.

If we need to deal with files in other format, we need to pay more attentions to this.

11. Support multiple countries, locales and languages

Many countries have immigrants from global, and there maybe more than one language even in one country, so we can’t decide there is only one language for our app.

I know we can’t test with all countries, locale settings and languages, but we can test the widely used languages and corresponding formats, such as English, Chinese, French, Spanish and etc.

We need to verify not only the display of them in app, but also the input of them.

12. High memory usage actions

Both iOS and Android have limitations for the memory size can be consumed by app, so when app need to deal with actions need to consume large memory, such as high density images, voices and videos, we need to perform the actions in another process, to avoid the memory leak or app killed by OS.

So we can check this by loading bulk of images, voices and videos.

13. Non-standard controls

On particular OS version, we may want to support some features, which OS can’t provide.

Usually we will implement it by ourselves or using 3rd party library.

One example is theme of app: in iOS 4, we need to implement it all by ourselves from scratch; in iOS 5, we can use UIApperance protocol to reduce some work; and in iOS 7, we can easily use tintColor property to achieve it.

If we are using our self made controls or 3rd party library, we need to pay more attentions when testing, to make sure the behavior the same as other parts.

And as in the example above, with the upgrades of OS, the control may be standardized and provided by OS natively. At that time, we need to merge our codes to native codes, to avoid merging it in the future.

To merge and test the codes are additional efforts compared to implemented it with native codes, so once we need to implement feature by ourselves or using 3rd party library, we need think twice before we actually work on it.

14. App upgrade

Most app will upgrade gradually, to bring new feature and experience to users.

Once user installed app, when upgrade it, they won’t uninstall it first, but overwrite it or install incrementally.

So we will also test how app behaves after upgrading, especially the user profile stored previously, and other data stored.

We need be more careful if there is app database schema change in app upgrade.

Likewise, we need to verify app stored data are removed after app uninstallation.

15. Integrate with 3rd party app

If app integrate with 3rd party app, such as Google Map or Facebook login, we need to make sure app can perform correctly when 3rd party app doesn’t work properly.

And we also need to monitor the 3rd party app or services.

Sometimes we need to consider to test when 3rd party app integrate with our app and want to share information to our app.

16. Reduce dependencies

We can try our best to reduce the dependencies to 3rd party system/app/service and other web services we need.

This can help us minimize the complexity of app and reduce the testing efforts.

We also need to use different methodologies to make sure they work fine, such as API and integration testing and monitoring.

17. Automation and Exploratory testing

Many companies and teams are using Agile now, so TDD and API testing are implemented in development.

For UI automation, we should use Test Pyramid to design our test first, then only automated test scenarios based user journey.

Because unit test can cover the functionalities in every activity and view, but they can’t help us when we are testing the interactions between activities and views.

Likewise, when we conduct exploratory testing, we should focus on the workflows with data in them, and the ways the activities/views interact with each other.

I suggest you to use simulator or emulator to do automation, and if you are testing Android apps, Genymotion is a good choice for you; and for exploratory testing, we probably can use devices.

For the automation tools, they are plenty of them: appium, Frank, Calabash, UIAutomation, UiAutomator and so on.

18. Security testing

Both iOS and Android support app to store their data in local SQLite databases, so we need to make sure the databases are encrypted.

We can also use tools like iPhone Configuration Utility and Android DDMS to sniffer the web traffic, checking whether there is cleartext in the request and response.

To test the security of mobile services, we can use the same way when we testing Web applications.

19. Performance testing

Performance testing can be also involved in mobile app testing.

It includes testing the app in slow network connection, batch load large quantity of data and such scenarios.

We can also test the performance of mobile services.

20. Operation System upgrade

Different with app upgrade, when operation system is going to upgrade, Apple and Google will let developers know in advanced, so that they can prepare their app to follow the new rules (guides :P).

When we testing the existing app, we need also to learn the changes introduced in new OS version, and prepare for them technically and in mind.

When the app for new OS is developing, we will cover the tests for both existing app and the new app at same time.

21. Benefits from Log

In developing stage, we usually use Crashlytics, HockeyApp and such tool to collect crash issues, which can make the life for both developers and testers much easier.

And we can also us iPhone Configuration Utility and Android DDMS to collect general app logs.

When releasing app to market, it’s better we can have some ways to collect the crash information, either to ask user to give feedbacks or ask user to allow app to send logs to us when necessary.

22. Continuous integration and continuous deployment

We can use continuous integration to help us find the stability issue and build a safe net for us.

Although we can’t 100% automate the process of continuous deployment, we can try our best to ease it, such as using TestFlight to distribute iOS apps, while using HockeyApp and other tools to distribute Android apps.

An alternative way to distribute Android app is using Dropbox: we can install Dropbox on the app package desktop and testing devices, once the app is packaged, we can use script to move it to the Dropbox folder on the packaging desktop; after Dropbox sync the apk file, we can open Dropxbox on testing devices to install the app.


I know those practices and sharing won’t solve all the problems and fix all the issues, but hope they can inspire you.

Since mobile apps are evolving, so does the mobile app development and testing. We will have new tools, techniques and methodologies in this trend. I am looking forward to hear your thoughts about mobile testing.

You can also find my presentation here.

如何出一本技术书

根据我自己出书的一些经验,给大家一些启发。

如何出一本技术书


####首先,你得有好的内容

  1. 内容的独特性和稀缺性会影响出版社对于销售量的预期,内容的针对性会决定读者的数量,从而一定程度影响出版社的销售预期。
  2. 此外,内容的丰富程度和详实程度,会影响读者对于书的理解,也会影响你通过这本书,对于读者的影响力。

####认识出版社编辑

  1. 认识一个技术类别的出版社编辑,不仅能帮助你调整文章结构,给你专业性的意见和鼓励,也能在你没有想法的时候,给你一些灵感或者方向,从而开始写作或者继续写新作。
  2. 认识编辑不需要去出版社门口蹲守,可以在会议上演讲,也可以通过线下活动的交流,甚至参与会议等机会相识。很多出版社都会派编辑去参加各种活动,无论是出于宣传出版社和新书,亦或是去找演讲者进行书籍出版的沟通。

####确定参与人员

  1. 在开始正式写书之前,需要确定有多少人参与写书。一般来说书籍封面上的著者(或者译者)不超过4人;如果超过4人,其他人只能写在内页上,而且这个人数也一般不超过6人。另一种办法就是著者写成某一组织,但是这对于个人品牌的建立有影响,需要权衡。
  2. 确保著者少而精也有个好处,就是能让决策更快,讨论和执行效率更高。

####分析和明确读者群体

  1. 不同群体的读者对于书籍的要求是不一样的。例如初级读者很可能需要在书中阐述基础知识和理论,而中级读者更多希望得到实践经验以及可以借鉴和启发的内容,高级读者需要技术内容更深入,最好能剖析问题的实质。
  2. 针对不同读者的需求,我们的书写方向和写作形式也会不同。初级读者很可能需要有代入感的故事,中级读者之需要介绍关键细节和可扩展的知识,而高级读者更希望了解问题的技术解决点和核心内容。

####编写大纲

  1. 大纲能帮助我们确定书写的范围,协助我们思考怎样衔接不同的章节,以及如何组织内容。
  2. 大纲的另一个作用就是可以帮助我们检查自己的进度,保证按时交稿。
  3. 大纲完成后也需要和编辑进行确认,保证方向和内容没有偏差。

####撰写样章

  1. 样章的作用在于确保我们书写的风格以及内容是编辑和出版社接受的。
  2. 同时样章可以让我们知道自己哪一方面知识储备需要提高,从而对书写有更明确的目标和估计。这就和我们在项目中对于技术难点进行Spike一样。
  3. 对样章的反馈需要及时调整,确保样章修改达到编辑的期望后再进行后续章节的书写。
  4. 对于样章我们需要更加关注,因为之后的章节基本都会仿照样章的模式进行书写,所以一定要确定样章可以作为后续章节书写的模版。对于多人合著,样章也可以统一大家的风格。

####签订合同

  1. 在完成读者定位,大纲撰写,样章审核之后,一般只要再加上著者的介绍,就可以进行正式的书写阶段了。
  2. 在这个时间段,编辑一般会邀请你到出版社签订正式的出版合同,确定你的出版收益,交稿时间,出版时间等。
  3. 出版收益主要分为一次性版税和版税抽成。如果出版数量比较少,文字量大,可能一次性版税(按照字数付稿酬)比较划算,如果出版数量比较多,或者预期之后还会加印,可以选择版税抽成。
  4. 版税抽成一般在8%~12%,如果是畅销书作者,可能会更高。决定这一比率的因素很多,比如作者知名度,市场上相关书籍的稀缺度,出版社的大小,和编辑的熟悉程度(:P)等。
  5. 版税抽成还分成首次出版抽成以及加印抽成。首次出版时犹豫出版社需要负责宣传和推广,所以基本是在抽成比例中只支付80%。
  6. 合同中还会确定版税抽成的支付时间。
  7. 合同也会明确著者需要多少本样书进行宣传。

####撰写内容

  1. 准备完成后就需要进行书写了。在书写过程中需要不断与编辑进行沟通,并让编辑对写好的章节反馈修改意见。
  2. 在发送给编辑审核之前,最好自己能先看一遍,有条件的话找专人审核与校对,会对文章的质量有不小的提升。
  3. 尽量在文章中提供配图。一是能补充文字不能表述的一些细节和相关内容,以可视化的方式呈现给读者;而是能让读者看书的体验更生动,理解更透彻。
  4. 保留书中所用到的图片资源,以及脚本,程序等各种使用到的资源并存档。后续的出版阶段会用到。
  5. 引用不同书籍和文章的地方,需要指出引用的是哪篇文章,原文是什么等信息。这里由于大家不是专业编辑,可以整理一份参考文献的内容,随书写好一起发送给编辑。
  6. 在书写过程中,尤其是多人合著,需要先确定术语如何翻译,如何使用。例如如果是写给初学者的,采用故事的写法,主人公的一些设定也是需要固定下来的。
  7. 对于章节中的内容,也需要分成不同小结和主题,进行论述。不然读者很容易失去焦点。而且在现在时间碎片化的社会趋势,如果能分成小的主题,而能带给读者一些思考,恐怕对读者的帮助更大。

####邀请名人写序言

  1. 尤其对于第一次出书的人,找名人写序言很重要。找名人写序言不仅能促进书籍的宣传,也能让他们提供意见进行及时的改进。
  2. 这其实也是一个更好的机会认识这一领域的资深人士,为之后更深入广泛的合作打好基础。

####根据反馈进行最后调整

  1. 准备好序言以及书稿之后,需要把这些内容发给编辑进行最后的审核,并更具编辑的意见进行最后的调整。
  2. 由于排版的需要,一般书稿的配图都需要重新调整,这时就需要用到写书稿时保存的这些资源。这些图片资源也是需要发给编辑的。
  3. 最后需要附带自己的一张照片,这也是会印刷在书中的。

####参加各种宣传活动

  1. 书籍印刷出版前后,出版社一般都会组织不少活动进行宣传。作为著者,需要尽可能地参加,帮助宣传。这些宣传活动不仅有线上的,包括主题问答(开源中国的高手问答)等形式;也有线下的,比如各种会议的主题演讲和沙龙,甚至签售。
  2. 也可以自己在各种社交媒体上宣传自己的新书。这对于有不少粉丝的著者来说更有效果。

####关注读者反馈

  1. 随着书籍的销售,我们也会获得读者对于书籍的反馈。利用这些反馈,我们可能会对书籍进行更正,或者对后续书写新的书籍明确方向。
  2. 获取反馈的渠道可以通过出版社,也可以通过网上出售书籍的网站获得用户反馈。

Bug集锦 -安全应该是全面的

写Bug集锦的目的在于分享从业这些年来遇到的这些有趣的问题,希望在读这些小故事的同时,能带给大家一些思考。

安全应该是全面的

小蔡被分配到测试工资系统,这个系统不仅公司内部会使用,而且还会有面向其他大客户的定制版。

由于工资系统的特殊性,不仅要求其在使用时的功能性,系统安全性也是一个很重要的指标。

为了让系统更安全,业务分析人员在项目初始时就为系统设计了动态短信密码和随机键盘的功能(图5.1),使得系统在用户登录时就能验证用户的身份。只有在系统内部注册过手机号,并在登录时通过手机获取动态短信密码,并使用随机键盘输入自己设定的登陆密码之后,用户才能访问工资系统。

在用户登录这部分,小蔡设计了不少安全性的测试用例,例如SQL注入等,但是都被系统防范住了。小蔡本以为安全测试做的很全面了,但是当测试功能点时,由于URL是www.xyz.com/user/123456的模式,她好奇地通过篡改URL最后的用户ID,期望系统能告知她无访问权限。可是没想到却查看到了另一个用户的信息。要知道企业内部的工号都是连续的,只要有人有耐心,这个缺陷可以让所有人的工资信息都曝光。

小蔡意识到不仅是篡改用户ID会有问题,而且系统的URL模式也可能会有更大的问题。因为普通用户的URL是www.xyz.com/user/123456,而系统管理员的URL是www.xyz.com/admin/654321,最后几位也是工号。要知道管理员是可以看所有人的工资信息的!要是有人使用www.xyz.com/admin/123456,会被认为是管理员吗?

小蔡带着这个问题进行了尝试,果真作为普通用户也被当成管理员,从而可以查看所有人的工资了。

看来系统只是在登录时作了严格的安全性检测,但是对于登录之后的用户权限,却丝毫没有考虑。

小蔡马上把这一发现通知项目经理,并确定这个缺陷为高优先级和高风险。整个开发团队在第一时间就修复了这个严重的缺陷。

好奇心没有杀死猫,反而帮助小蔡在测试中发现了一个隐藏的重大安全性缺陷。小蔡也意识到,一个系统的安全性,并不单纯来自于防范系统外部的入侵,还需要严格审视系统内部的安全性漏洞。系统内外部的安全性是一体的,需要全面的设计。

#####【扩展知识】
动态短信
随机键盘
SQL注入
OWASP Top 10
URL pattern
URL篡改

Bug集锦 -理论与现实这么近

写Bug集锦的目的在于分享从业这些年来遇到的这些有趣的问题,希望在读这些小故事的同时,能带给大家一些思考。

理论与现实这么近

作为计算机系毕业生的小蔡,一直觉得学校里学的理论知识,和现在的测试工作差距太大,在实际的工作中也没有什么作用。直到有一天她碰到这么一个有趣的问题。

小蔡负责测试的是一个Web产品,基于不同的搜索条件,会显示大量的结果。由于搜索结果太多被分成了很多页,为了方便用户快捷跳转到特定的页面,开发人员特意设计了一个页面快速跳转的功能。

搜索结果页面快速跳转

图 1.1 - 搜索结果页面快速跳转

在设计测试用例的时候小蔡就留心了,因为很多测试理论的书籍都描述过,对于输入框可以进行的验证点很多,比如说特殊字符、超长字符、负值、0值和null值,以及很大的数值等。对于大部分的测试用例,开发人员都处理得很好,没有发现缺陷,小蔡也松了口气。

当测试到输入很大数值的用例时,由于不确定多大的数值会出错,也不能拿到代码,小蔡就自己选了一个数值:9999999999(10个9)。输入10个9、点击确定,突然,页面崩溃了!100以内的小数值,以及输入小于等于搜索结果页面数的数值等情况,小蔡在测试中都选取过,测试结果都很正常,那到底数值大到什么程度的时候页面会崩溃呢?一时想不到更好的办法,小菜只好硬着头皮使用尝试法开始确定出错的数值范围。

10个9,出错;9个9,正常跳转到最后一页。突然小蔡想到,数据结构课程不是学过很多查找法吗!二分法就这么出现在了眼前,对,二分查找法!,5000000000(9个0),出错;2500000000(8个0),正常。没有线索,就这么一点一点查找。花了3个小时,小蔡终于定位到出错的数值:4294967295。小蔡很纳闷,怎么是这么一个奇怪的数值呢?有零有整的。计算机专业的背景给了小蔡一个提示,不会是2的多少次幂吧?果真,4294967295是2的32次方-1。和开发人员一沟通,才发现由于开发人员设想页面最大不会超过2的32次方,所以对于这个字段可以输入的最大数值的类型,选择的是int32;但是同时又没有对超过这个范围的数值进行任何的处理,就造成了程序判断中对于请求更大数值的页面时的溢出,从而导致了产品页面的崩溃。

发现了这个隐藏的缺陷,小蔡还是很有成就感的,但又觉得如果能早点知道代码的逻辑,可能自己就不会花这么长的时间了。同时,一直觉得计算机的理论知识不会应用到测试实践中,可没想到这次多亏了学校中学到的这些基础知识,不只是int32,2的32次方,甚至还有二分查找的算法也给了自己解决问题的灵感。没有这些知识,定位问题就更困难了。

#####【扩展知识】
边界值分析
二分查找法

出差实用小技巧

由于我去国外出差比在国内出差的经验要多一些,所以本文以去国外出差为主,讲述个人经历中那些必不可少的checklist。

国外出差

出差前你通常需要准备的:

  1. 护照

    不用说,一定要保管好。也只有在机场才会用到。

  2. 插线板

    无论去哪里出差,带个插线板是必不可少的,可谓居家旅行的必备。哪怕是去英国这样的地方,也只用带一个转换器即可让手机啦,电脑啦之类的设备保持电力充沛。

  3. 国际漫游

    出国出差前开通国际漫游,一个是为了紧急情况能接打电话(才不告诉你是因为到机场没司机没电话没外币才觉得国际漫游是必要的),另一个是为了方便接收短信。

  4. 拖鞋

    飞机场和国外公寓一般都不提供拖鞋,为了让自己长途飞行轻松一些,拖鞋也是必要的。

  5. 耳塞

    和上面一样,能抵御飞机上小朋友不间断的哭闹以及别的乘客的鼾声。

  6. Kindle,iPad或者书

    能缓解你等飞机,等车,等anything时的焦虑。

  7. 这个看个人习惯了,有人习惯不带,等有雨了再买,我习惯去哪里都带着,也许是第一次出差养成的习惯。

  8. 男士-剃须刀,女士-不知道

    出差一般都是去客户现场,那去了可不能太随意,一定要注意自己的仪表,剃须刀就派上了大用处。

  9. 一双合适的鞋子

    有着好的空气和环境,再不去锻炼可就太亏了。

  10. 一张以上的储蓄卡,一张以上的信用卡

    储蓄卡和信用卡最好是visa的,虽然银联的也都通用,但是有些地方银联的ATM不见得那么多。推荐一张以上是因为笔者遇到过银行卡消磁的sui事。。。储蓄卡推荐大家办华夏银行的,每日第一笔境外取现免费,办理也容易。

  11. 少量的外币现金

    基于上面银行卡的建议,大家可以少带现金,毕竟国内兑换汇率不划算。但是也别不带,不然出现任何意外(atm不支持银联,机场打车没现金等),欲哭无泪啊。

  12. 查好公寓地址以及机场到公寓的交通方式

    这是以防万一的一招,避免司机没接到你的情况,可以自己到公寓。最好能打印出来,或者存在手机上面。最好把国外办公室发给你的出差邮件打印出来。上面都有紧急情况联系当地公寓供应商的联系方式。

  13. 查好客户办公室的地址和交通方式

    和上面一样,这是避免你没拿到公司给你的手机和无线网卡的情况。还可以根据交通方式,办理最适合的交通卡之类的。

  14. 了解出差地点当地的天气和温度

    这决定了你要带什么衣服,拿几个箱子,怎么搭配。

  15. 了解哪些同事也在同一时间段出差

    可以一起约着玩,在异乡也有个伴。

  16. 翻译过的驾照

    在澳洲租车自驾还是很方便的,但是前提是要有翻译过的驾照。

  17. 出差计划

    提前和客户沟通出差的目标,以及需要配合的人等,事先为出差做好准备。

  18. 了解客户的dressing code

    虽然公司对于着装没有要求,但是客户有的时候有,所以给予客户尊重,做合适的穿衣搭配。

  19. 别忘记给客户带一些小礼物

    一般客户对中国文化都比较感兴趣,礼物无论大小都会拉近距离。

  20. 最后得带个大箱子

    估计不少同事朋友都得让帮着带东西,小了放不下。:P

出差期间,你可能还需要注意这些:

  1. 制订每一天的计划

    根据总的出差计划,制订每一天需要完成的目标。在每天结束时,查看进展,从而调整第二天的计划。

  2. 流程化解决每天早中饭,晚上再用特色美食犒劳自己

    老外一般对于早中饭都比较随意,更注重工作的效率,咱们也可以按照他们的习惯来;晚饭的话利用的是自己的时间,就可以按照自己的喜好来了。不过不推荐大家吃中餐,普遍都不怎么好。

  3. 配置网络,找到座位

    到客户那里,最先要解决的就是如何上网和在哪里工作的问题,一般都可以通过客户的team lead来协调。

  4. 和客户building

    形式有很多,例如上班时间喝杯咖啡,下班后喝酒、吃饭,或者周末一起出行;如果碰到客户的Friday drink和年会等活动,更是拉近关系的好机会。需要注意的是在这些活动中要学会请客,不要什么都请,也不要什么都不请,度要拿捏合适。

  5. 给客户做session

    记住你的title包含着consultant,到客户现场,需要把好的实践,工作方式和工具,介绍给客户,让客户了解咱们的技术实力。

  6. 有机会多和客户pair

    和上一条一样,好不容易有了一起工作和合作的机会,咱们需要通过pair的方式,要让他们认识到咱们不光能说,还能从技术上实现。

  7. 观察客户的座位

    这是之前一个资深的BA告诉我的,咱们可以通过客户的作为,找到最合适帮忙的人,例如谁和业务人员坐得近,可以从他那里得到更多的业务相关信息等。

  8. 观察客户的工作模式和习惯

    这样可以协调我们的工作来相互配合,例如中午饭一般客户都什么时间吃,会持续多久,换成北京时间,我们什么时候找客户会比较合适。

  9. 参加客户的showcase

    最好能自己主动负责一次showcase,尤其是有客户大老板参与的showcase。这样会加深客户对我们的印象,加强双方的合作。

  10. 在Facebook,Twitter,Linkedin上关注客户,时不时地互动

    最好在和客户关系拉近之后再这么做。

  11. 观察团队的表现,并及时反馈给团队

    观察自己的问题始终是很难的,而客户一般也不会直接告诉你有什么问题,这就需要在客户现场的我们发现可以提高沟通效率的方式,做出改变。

  12. 及时告知团队可能缺失的信息

    在客户现场开会和讨论时,时常会发现客户会提到一些团队不了解的内容,我们需要及时告知团队,也使得客户也意识到存在信息不均等的问题,从而在以后的开会和讨论中更多的给相关上下文。

  13. 问客户要反馈

    可以是对个人的反馈,也可以是对团队的反馈,还可以是对session或者会议的反馈。这比从邮件或者客户manager得到的反馈要准确和真实的多。

  14. 充分利用闲聊

    在闲聊中介绍团队的情况和每个人的特点,让客户熟悉团队中的“人”,而不只是作为工作的伙伴。

  15. 每天换衣服

    西方人认为你两天穿同一件衣服,是代表第一天没回家。所以可以充分利用公寓的洗衣机和烘干机,方便多换几套衣服。

  16. 参加当地办公室周五的Friday lunch

    听别的办公室的发展和大家的想法,了解和熟悉更多的外国同事,说不定还能碰到熟人或者仰慕的大牛呢。

  17. 参加当地的社区活动

    如果能刚好赶上当地的agile conference或者各类专题讲座就太好了,能了解到和国内的不同,也可以学习到不少实践,Copy to China。:)

  18. 多到处走走,熟悉当地的情况

    这样的话在客户说一些本地的情况时,和客户有更多的共同语言,聊得更深入。

  19. 给大家带小吃

    这个就不用多说啦。

当回到办公室之后,你可能还需要做这些事情:

  1. 总结出差收获

    给团队分享客户的情况和每个人的特点,让双方都相互了解得更多。
    在社交网络上保持和客户的联系。如果能让客户用微信就更好了。

  2. 利用和客户面对面交流过的优势

    在standup时先就各种新闻或者客户社交网络的更新闲聊两句,让双方更有一个团队的感觉。

  3. 填写报销

    一定要及时填写,超过3个月可就不能报销了。

国内出差

  1. 选对机场

    很不愿意回想起培训地点在上海虹桥机场附近,结果买票买到了浦东机场的经历。。。

  2. 随身无线路由器

    解决住酒店时只有有线网络的情况。

  3. 4g无线路由器

    有些客户是不提供非员工的上网的,所以当我们要连外网进行演示时,最好能有一个稳定的接入方式。

  4. 了解培训受众

    知己知彼,百战不殆。我们需要根据手中的不同,调整培训的内容和重点。

  5. 和负责客户的同事聊一聊

    有些培训是作为咨询的一部分交付的。所以需要配合咨询的同事,不仅从受众那里确定需求,还需要辅助咨询的项目开展工作。

Book references

在写《移动app测试的22条军规》时,参考和总结了一些移动app测试的资料。

本来是作为书的最后一部分“参考资源和文献”发布出来的,但是出版社的编辑不知道出于什么原因,没有收录在书里。

在这里我把这些资料发布出来,希望对大家有帮助。

For the references of my book , please refer to 参考资源和文献/References for more details.